For the people behind the routes
Great routes.
Ready to be found.
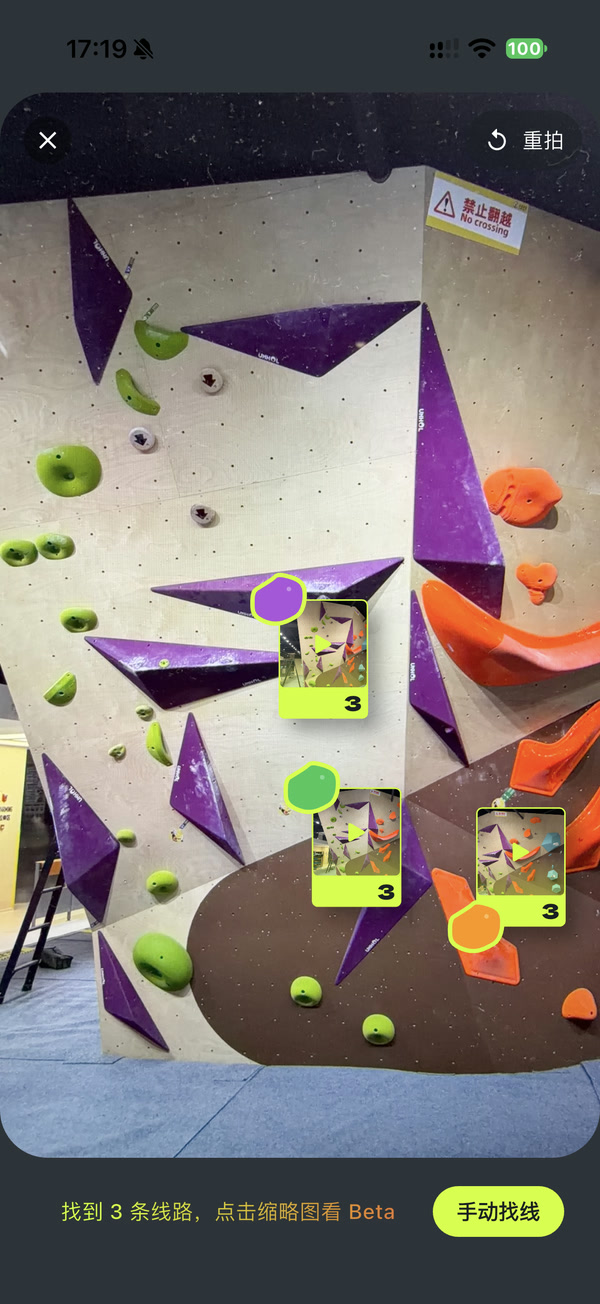
Help climbers browse your routes and find routes and Beta with a photo of the wall.
Use the KEKE app · For onboarded gyms
Use an account with gym access. On your first visit, set up areas and grades.
Demos are sped up. Yellow rings highlight action targets.Set up your areas
Use the names your team already knows. Routes and resets are organized by these areas.
- Name each area
Choose “Set up areas” and enter names such as Area A or Moon Wall.
- Choose its climbing type
Choose bouldering or rope climbing. Create separate areas for each type.
- Sort and confirm
Drag to reorder, then confirm your areas to continue.
What if our gym has no areas?
Choose “No areas” and a climbing type. If you offer both types, create separate areas.
Set up your grades
Keep the numbers or tape colors your climbers know.
Already using V grades / YDS?Choose “Use standard grades”. For custom grades, follow these steps.
- Enter your gym’s labels
Add numbers or tape names, from easiest to hardest.
- Map to standard grades
Scroll each grade column to choose its V grade or YDS equivalent.
- Review and confirm
Tap Save, review the mapping, then confirm to save.
Does one label cover a range?
Choose one standard grade for each label. Several gym labels can map to the same grade.
Can I change the scale after saving?
A saved scale cannot be edited directly. Replace it with a new scale and review mappings for existing routes.
Choose the reset cycle
Use an existing cycle if it fits. Otherwise, create one.
- Create a cycle
On the Routes tab, tap New cycle and choose the areas.
- Enter the reset dates
Set stripping and completion dates. You can also schedule a future reset.
- Select this cycle when adding routes
The whole batch belongs to the chosen area and cycle.
Add your route setters
Build your roster so you can credit setters when adding routes.
- Add a setter
Gym workspace → Gym → Setters → Add setter.
- Enter a display name and save
A photo, real name, and other details are optional. Tap “Add setter” to save.
- Keep the roster up to date
Use “⋯” to edit details or deactivate a setter. Existing route credits stay intact.
You can also link their Keke account here
Tap “Link account”, find and open their profile, then confirm. Use “⋯” to change or unlink an account.
Collect photos and videos
Photos become routes. Videos become official Beta.
Already on your phone
- Materials → Upload → From phone.
- Select photos or videos in bulk and confirm.
- Check progress in Materials or My uploads.
Still on the setter’s phone
- Upload → Invite a setter to upload.
- Share the invite on WeChat. It lasts 72 hours.
- Completed uploads appear in your gym’s library.
Quick guide for setters
- Open the WeChat invitation
Open the invite, enter Keke and sign in. After installing, reopen the original invite in WeChat.
- Check the gym, choose your files
Check the gym and choose photos or videos. No route details are required.
- Check upload completion
Check My uploads. Completed files go straight to the gym; retry failed items.
The invite allows uploads only, not gym management. Ask for a new invite if it expires.
Direct link to this section #Can I leave before an upload finishes?
Yes, but the system may pause background work. Reopen Keke and check My uploads to continue or retry.
Turn photos into routes
Routes → Add routes → Choose an area and cycle.
- Choose photos from the library
Select several photos at once. Each starts one route.
- Check the color, grade, and setter
Choose a grade. Select a setter if you want to credit them.
- Review and submit
Tap Review and submit, check the overview, then submit the routes.
Keke preselects a hold color from the photo. Check it and change it if needed.
Take a photo, add a route
- Choose Capture routes, take a photo, and enter color and grade.
- Tap Save and take next or Save and finish.
- Saved items process in the background. Check the session overview for results or retries.
What if one photo shows multiple routes?
Use “Add another from this photo” and set each route’s color and grade. Skip a draft to leave it for later; the original stays in the library.
Confirm official Beta
Keke finds likely videos. You make the final call.
- Check the suggestion
Look for library match suggestions on the route card.
- Preview, then confirm
Preview the video and adjust its range if needed. Return and tap Confirm.
- Check the linked result
The video appears on the route. The link is complete.
Automatic matches are suggestions. Only confirming links the video to the route.
No match, or the wrong suggestion?
Ignore unsuitable suggestions. Tap Choose official Beta, select library videos, then Link selected.
How do I fix the wrong link?
Tap X on the linked thumbnail, confirm unlinking, then choose again. The source remains in the library.
Keep your gym up to date
For the next reset
Create a cycle for the area, then upload, add routes and link Beta. Keep your existing areas and grades.
A route comes down early
Use Take down route to preserve climbers’ history. You can undo a mistake.
An incorrect or duplicate entry
Use Delete route for mistakes or duplicates. The route and official Beta go to the bin and disappear from public history.
A color, grade, or credit needs fixing
Edit the relevant details in route management.
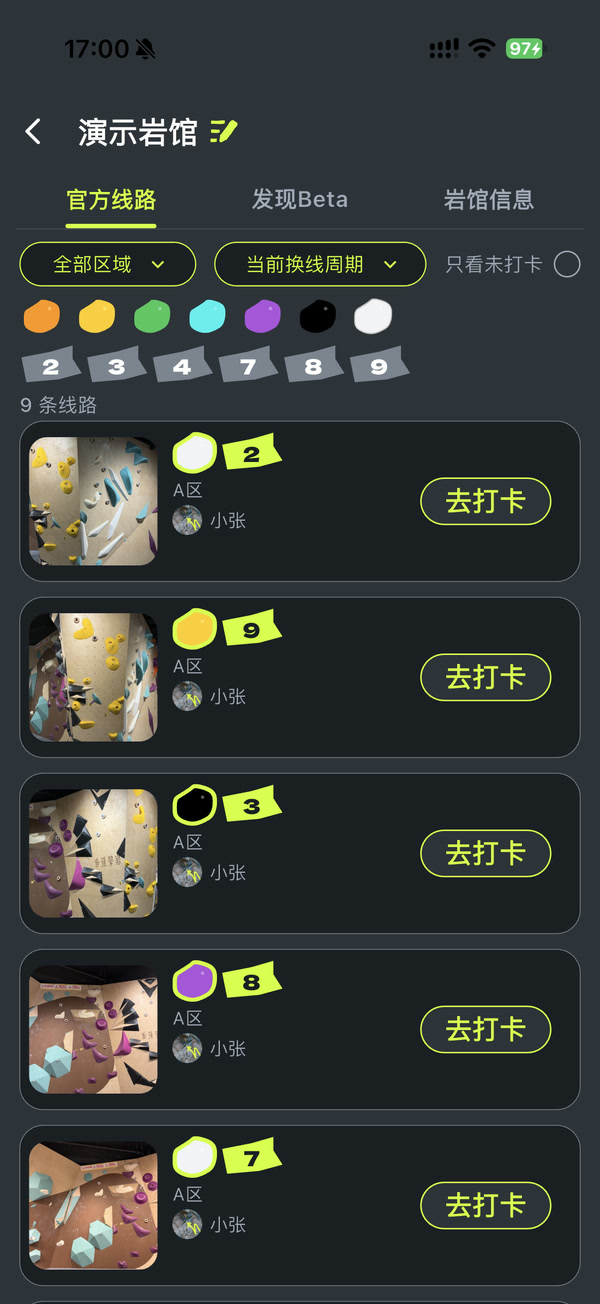
Finally, see it through a climber’s eyes.
Check the route photos, grades and official Beta, then see how climbers discover your routes.
Browse official routes
Find routes by photo
A few useful answers
Cannot find the gym workbench?
Check you’re using an authorized account and the latest App. Contact your gym lead or Keke support if it is still missing.
Does uploading a file publish a route or Beta?
No. Photos need route submission; videos need confirmed links. There is no whole-cycle publish step.
Will cleaning the library delete existing routes?
No. Cleaning the library does not delete existing routes or official Beta.
Can I perform these steps on a computer?
Read on a computer and follow along in the phone App. The desktop merchant console has different capabilities.